The first thing you're going to want to do is locate the programs you'll be using to make the agent. There are several different tools that can be used to create agents, but for this tutorial I'm going to go over the regular Windows tools, as they are what I normally use.
Each phase of agent creation requires one or two tools:
- Sprites are the images that represent your agent in the game, and sprite-making is normally the first step in creating an agent. You can use any graphics program you like to create sprite images, but in order to convert those images to the C3/DS sprite format (.C16) we will be using a program called SpriteBuilder.
- The substance of an agent, including its behaviors, are determined by its scripts. Creatures scripts are written in a language called CAOS, and this code is saved in .COS files. I strongly recommend using the CAOS Tool to create your .COS files, because it has a lot of features that make it really indispensible for coders.
- Once our agent is ready to be released, we will package it into an .AGENTS file that we can share with other people. The program that does this is called PRAY Builder. For simple agents (eg. things that are not metarooms or breeds) there is a tool that makes this process even easier: the appropriately named EasyPRAY.
Four programs might seem like a lot, but rest assured they are all quite small.
While it isn't a tool per se, I would also strongly recommend that you create a project folder somewhere on your computer, where you can keep all the files you use to make your agent. Between sprites, sounds, scripts, catalogue files and PRAY files, even a "simple" object has a lot of components. You will need to keep them all in the same place, preferably somewhere you won't be trying to pick them out of other unrelated projects or files.
A sprite file is a series of images all packaged together. Each image in the file is called a sprite. These sprites (usually) form an animation when you play them in sequence. So the best way to visualize a sprite file is to think of it like a film strip. Each sprite in the sprite file is like a single frame on a film strip.
When you make your own agents, you can use any graphics program you like to create your sprites. I've used Photoshop, Gimp, and even Paint in the past. I don't plan on spending a whole lot of time working on the graphics for our tutorial agent, so I'm going to use a set of sprites I already have sitting around.
Okay Brux, we're going to make you a fun new toy to play with. I have just the thing: a cuddly (er... not) Banshee dolly.
This dolly was originally made for Primordia Redux, but it wasn't included with the finished metaroom—I'd packed so many other agents into it that adding another toy just seemed excessive. The Photoshop file with the sprites has been sitting on my hard drive ever since, just waiting to be used. All we need to do is get those sprites into SpriteBuilder.
There are a few ways in which C3/DS is picky about its sprites. Some of the criteria are also different from the earlier games, so if you have previously developed for Creatures 1 or Creatures 2, there may still be a slight learning curve. In particular, you will want to keep the following in mind when you make your sprites:
- Any pixels that are pure black will be transparent in-game. Any pixels that are not pure black, even if they are really dark and look black at first glance, will be visible in-game.
- All sprite frames used by the same agent must be the same size. If the agent tries to switch between sprites that are different sizes, it will cause an error.
- Try to keep blank space around the object to a minimum. The game only checks to see where the edges of the sprite are, not which pixels are transparent, when it determines how big the agent is. This means that if there are blank pixels underneath the object, your agent will appear to float in midair. A more detailed explanation with images can be found in my Bounding Box Tutorial.
- If you must save your sprites in regular image format (for instance, if you're making sprites in Paint), be sure to save them in 24-bit Bitmap (.BMP) format. Other formats can result in a loss of color quality or will mess up your sprites' transparency. I have seen multiple projects set back because the spriter chose to save the sprites in JPEG format, and as a consequence their sprites had to be redone. When it comes to sprites, just say no to JPEG format!

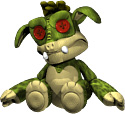
On the left is an example frame from the Banshee dolly. As you can see, it's a simple black square with the object inside of it. There is some space above it and on either side, because the dolly's head and arms will move when it animates. The bottom edge of the sprite is as close to the dolly as possible.
Once you have finished creating your sprites, it's time to convert them into a real sprite file that can be used in-game. Be aware that SpriteBuilder is a little finicky in terms of what kind of file it is willing to import, regardless of which method you use. It will only accept files in .BMP format, and they must be 24-bit. Otherwise SpriteBuilder will not be able to read them.
If you are using Photoshop, you will also need to make sure the box that says "Flip row order" is checked when you save each file. If it is not checked, SpriteBuilder will not import the files correctly. Don't worry too much about this kind of thing, though; if a sprite doesn't import correctly, you'll be able to tell immediately.
There are three ways to get sprites into SpriteBuilder:
- You can copy and paste (Ctrl+V) each one directly into SpriteBuilder.
Of course, some programs (like Photoshop) save files differently than how SpriteBuilder prefers. This can result in the sprites becoming mangled when pasted in, since SpriteBuilder can't read them correctly. To counteract this, some people copy the sprite from their graphics program, paste it into Paint, then copy-paste it again into SpriteBuilder.
I wouldn't recommend this method if you have more than, let's say, ten sprites. It becomes very time consuming to copy-paste a lot of sprites, not to mention tedious.
- You can save each sprite in .BMP format and import them into SpriteBuilder.
Many people do it this way, but in my experience it's only really convenient if you're using batch processing to save the sprites. If you're just going to save each one by hand anyways, then it would probably be more efficient to use one of the other two methods.
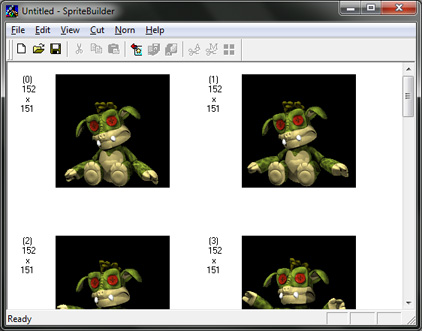
If you choose to save your sprites as bitmaps, the bitmaps must follow the correct naming convention. SpriteBuilder won't even give you the option of importing them unless they are named correctly.
The filename must have a dash and then a number at the end, and the first frame in the sequence must be numbered zero (0). For example, I might name my first sprite "bansheedolly-0.bmp". SpriteBuilder will automatically import any other files with the same name, such as "bansheedolly-1.bmp", "bansheedolly-2.bmp", and so on.
- Or you can create a sprite sheet, copy and paste the whole sheet into SpriteBuilder, and then have the program cut out each frame for you.
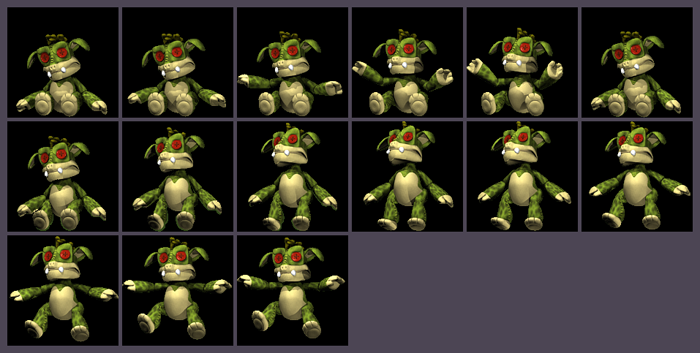
This is how I usually do it, and in my experience it's the most time-efficient. Take all your sprites and arrange them side by side in a row, or if you have a lot of them, you can arrange them in a grid. Separate them using some solid color, preferably a color that isn't used by your sprites. The thickness of the lines separating the frames doesn't seem to be too important, as long as the lines are the same color and relatively consistent in thickness.
Copy-paste the whole sprite sheet into SpriteBuilder using the first method, just as if it were a single sprite. Then go to the menu and select Cut -> Automatic Cut. It may take a few seconds depending on the size of the sprite sheet, but SpriteBuilder will slice and dice your sprite sheet and you should be left with a nice, clean set of sprites.
You can download the Banshee dolly sprites as individual bitmaps here if you would like to experiment with copying and pasting them, or try out SpriteBuilder's importing feature yourself.
This is what the sprite sheet for the Banshee dolly looks like. If you want, you can click on the image to download the bitmap file.
However you choose to import your sprites, the end result will be the same. So slap a name on your new sprite file... you can call it whatever you like, but it's a good idea to avoid weird characters like apostrophes or spaces, and keep the name all lowercase (no capital letters).
We now have the visual representation of our agent that will be used in the game. Our next step is to tell the game how it interacts with its environment... and how its environment (including Creatures) can interact with it.
So paste a copy of your new sprite file into your Creatures 3/Images or Docking Station/Images folder (or both, depending on which game(s) you're developing for), because you are ready to move on to the coding portion of the tutorial.
Onward to Part 2!